

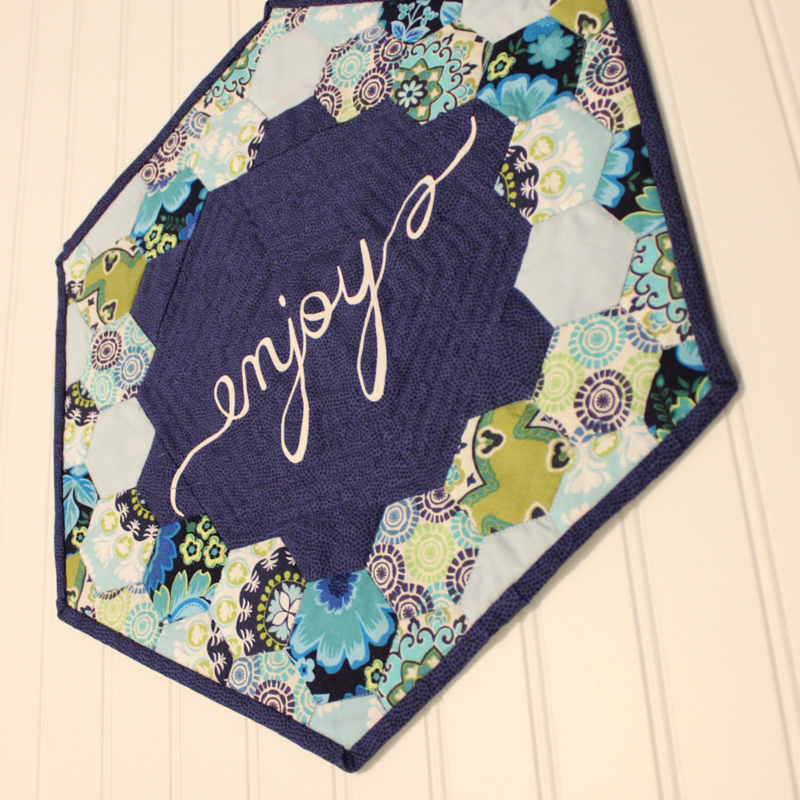
No time for hand embroidery? Well then, I’ve got a perfect alternative for you: flocked heat transfer. Embellishing patchwork with embroidery adds so much to the finished piece but it can be a time consuming task (even if an enjoyable one). So I decided to try out the flocked heat transfer and give that extra touch that my hand pieced hexies deserved (find out more about this project).
I hand lettered the word “enjoy” and traced it in Silhouette Studio, but we will leave that for another day… Go over to the Silhouette Design Store find a shape that you love (this shouldn’t be too difficult ;) and come back here for the step-by-step.
- Open up your shape in Silhouette Studio.
- Resize it to your desired length/height
- Right-click the image and select the option “flip horizontaly”.

- Now your design is ready to be cut. We just need to set up the machine.
- Turn on your Silhouette and have a look at the position of your roller. If it is not as in the picture bellow, you will have to move it.

- Skip this step if rollers are in correct position (refer to image above). Turn the blue lever down and move the white roller to the middle notch. It should click into place. Turn the blue lever up again. And you are ready to move on!

- There is no need to use the mat when cutting heat transfers. Align the heat transfer to the guideline with glossy side down. Choose the option “load media” (in the “old cameo” not sure how the new cameo displays this option but it must be something similar)
- Go back to Silhouette Studio and under “cut settings”, choose the option “Heat Transfer Materieal - Flocked”.
- Change the blade depth to the recommended setting, which is 3.
- Everything looks good and we are ready to cut! Press “send to Silhouette”, sit back and relax!
- Once it is cut, click “unload”
- I like to cut a straight line with scissors to separate the design from the left over heat transfer.
- Now with the hook tool, remove all the extra heat transfer surrounding your image.

- Place the heat transfer on top of the piece you’d like to embellish, with the plastic side up.

- Place a cloth on top and carefully iron it. It is better to just keep the iron on top for a few seconds, instead of moving it back and forth.

- You may need to go over the same spot a few times. After doing this the plastic cover will be hot, so allow some time for it to cool and the design to set in.
- Carefully start peeling the plastic cover away. If the heat transfer is still stuck to the plastic cover try ironing again, with a cloth on top. The edges may take a little more time to set in.

- Once you get that plastic out you are good to go! I like to iron it one last time without the plastic just to make sure the heat transfer is well bonded.
I am really happy with how this turned out. I quilted around the heat transfer, since I wasn’t sure how well the needle would go through the heat transfer.

Nothing can beat hand embroidery when it comes to beauty, but as far as “speed of execution” is concerned, the flocked heat transfer is the winner by far!
Enjoy your day!
No comments:
Post a Comment