Monday, March 28, 2016

How to cut fabric in your Silhouette


One of the things I like most about my Silhouette is its ability to cut fabric. It simply opens up so many possibilities for folks who like sewing. Today I will show you how easy it is to add an appliqué to a quilting block. If you would like to follow along, this is what you will need to make one 6’’ block.

Materials:

  •  6.5’’ square of fabric for the base (mine is light blue)
  • 5’’ square of contrasting fabric for the applique (dark blue)
  • Coordinating thread
  • 4.5’’ square of Silhouette Sewable Interfacing
  • Iron 
  • Silhouette Design Store Design ID#63952 – Summer Shapes
  •  Silhouette Cameo/Portrait

Instructions:

  • We will start by prepping the fabric. Place the fabric on an ironing board with the wrong side up. Place the interfacing on top with the rough side facing the fabric. Press for 2 seconds. Trim the fabric to the same size as your interfacing. 

  • Remove the paper liner from the interfacing. 
  • Place the prepped fabric on the top left corner of the cutting mat, interfacing side down. Load the mat to a Silhouette machine. 

  • Now we will move to the computer, which should be connected to the machine via USB. Open the design in Silhouette Studio. Ungroup the elements. Delete all the shapes except the first butterfly.  


  • Resize the shape, using the “Scale” window. Change the width value to 3.25’’, making sure the “Lock Aspect” box is checked. This allows the image to be resized evenly. 

  • Place the shape on the top left corner of your mat (this is where we have kept the fabric).
  • Open the “Cut Settings” window > Choose the option “Fabric – thin like cotton fabrics”> Adjust the blade according to the recommended setting (make sure you are using a fabric blade) > Click “Send to Silhouette”. 
  • Unload the mat and your appliqué is ready to be used! Center the wings on the fabric base and iron it down for about 8 seconds. 
  • Now you can be creative and hand-stitch it into place or use your sewing machine. Note that since this is a sewable interfacing it still needs to be stitched, the adhesive is only a temporary bond. 

  • Your quilting block is ready! I decided to add some leftover fabric I had from a different project. This is how my final block turned out. 


I turned my block into a pot holder! And just in time to take my soufflé out of the oven ;) What would you do with your appliquéd quilt block?


Monday, March 21, 2016

Finding Peace Within


When I saw this quote from Emerson on Pinterest I immediately pinned it and I knew I'd have to turn it into some kind of artwork. I enjoyed so much hand-quilting last weeks's project that it wasn't hard to decide what to do with it.

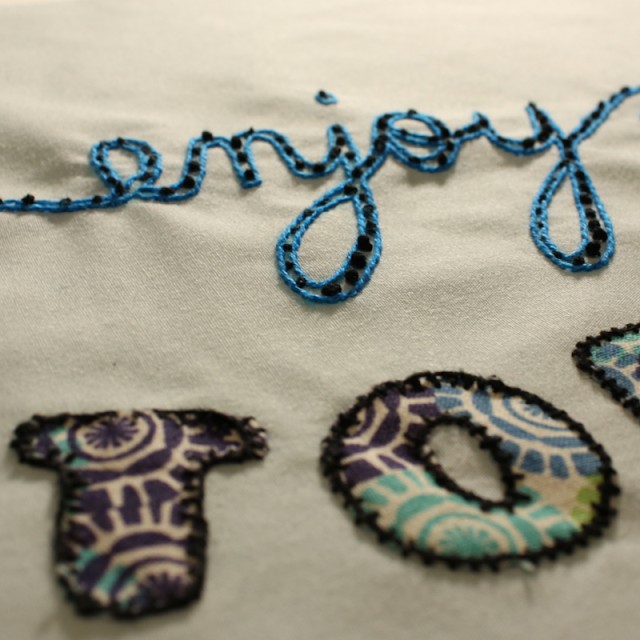
I used my beloved frixion with the Silhouette pen holder to get my design onto the fabric. Did some embroidery along the lines. And this time I was a little smarter, I drew the quilt line on Silhouette Studio as well, no need to use the eraser in case I didn't like the way it looked...


I am a very spiritually inclined person. I really do believe that our source of joy is inside of us. It cannot be taken away from us by anyone or anything except ourselves. Having these inspirational quotes all over the house help me remember that. At a time when the world seems to be lacking so much peace and understanding, I really wished we could all just go inwards and feel the peace that emanates from within. That inner silence that nourishes our whole being, that meditative state which clears the mind of thoughts, anger and fear.  I digress... but hope this inspires you to decorate your own space with beautiful words to live by!

Monday, March 14, 2016

Hand-Quilting loves frixion Pens


Remember that free .studio file I shared a few weeks ago? Well I decided to hand-quilt it! This is a first for me! Actually I didn't really have an option. Since it was all hand embroidered I couldn't just machine quilt lines over it. I would have to do some free-motion quilting... Someday I hope to be able to do that, but that day is not today!
So I got my new favorite pen - frixion and drew random lines all over the piece. I was even able to erase certain parts that didn't come out quite to my liking. I just used the eraser that comes with the pen for those little parts. It didn't completely come off, but enough for me to be able to reroute the lines the way I wanted.

I made my sandwich and just quilted over the drawn lines. This is just so relaxing - I love it!

Once I was done I carefully pressed with an iron and all the marking were gone! YAY! If you don't want to iron it, I'm pretty sure the markings will come out once it is washed in warm water.


I noticed that I my tension was not even throughout. Some parts (where I didn't pull the thread "hard" enough) remained very flat. While other areas I pulled the thread too "hard" which resulted in a puffier quilt. I'll have to get more practice to fix that.

I also binded the quilt using the backing fabric. I think I will be using this method more frequently, I really liked how the mitered corners turned out.


Hope you really enjoy your day today!

Monday, March 7, 2016

Sewing tutorial using a .studio free file


I have been experimenting different ways to mark fabric with my Silhouette. I've used the mark-b-gone pens successfully (the ones that disappear with water). But I was curious to see what I would get if I used the frixion gel pens. Guess what? It worked beautifully, maybe even better than with the mark-b-gone pen. I am sharing the pattern for this coaster as a .studio file, in case you would like to give it a try.

Materials used for 1 coaster (finished size is 4 3/4" x 4 1/8"):

  • silhouette cameo
  • silhouette pen holder
  • frixion gel pen
  • 1 square of solid fabric (for the back) measuring: 6" x 6" 
  • 1 square batting measuring: 6" x 6" 
  • 1 square of solid fabric (for center hexagon): 4" x 4"
  • 6 rectangles of assorted printed fabric: 1.5" x 3" 
  • coordinating thread
  • sewing machine

Instructions:

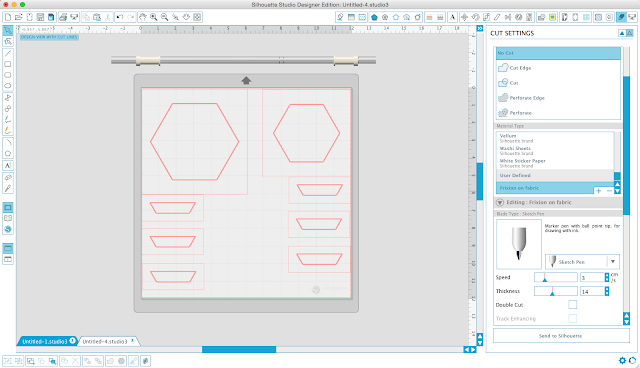
  • Open the file in Silhouette Studio. The squares and rectangles surrounding the hexagons and trapezoids represent the fabric. We don't want to mark those, so make sure you select them and choose the option "no cut". Go to cut settings and choose the option to add a material. I named mine "frixion on fabric" that way I know the exact settings that worked for me. Choose "sketch pen", speed 3 and thickness 14.

  • Now put your fabric on the mat with WRONG side up. Make sure you place each piece exactly as it appears in the file. Load the mat. On your computer click the button "send to Silhouette". And in a few minutes the fabric will be marked!

  • Cut around the marked line giving a 1/4" seam allowance.
  • Now it's piecing time! You could do this in your sewing machine, or by hand. I prefer to do this by hand because I can do it while the kids are playing. If they see me in my sewing machine they jump in and I can't get anything done. Make sure you use the smaller hexagon as the central piece (the bigger one is for the backing).

  • I know most people stitch hexies using the EPP method, but I just love the traditional hand sewing. Since all my fabric is marked it is really easy to line up the fabric and sew a running stitch along the line! I use a pin to mark the endpoint and backstitch the first as well as last stitches. I do about 1/8" stitches and bunch up about 6 of them before bringing up the needle (as though you were making a ruffle). Make a know and cut the threadI straighten the fabric and do a backstitch before proceeding. I hope this makes sense, it sounds way more difficult than it is!

  • Once the first side is stitched layer the second piece on top of the first (right sides together) and sew the seam that joins the 2 trapezoids. Backstitch the last stitch but do NOT cut the thread! 
  • Now turn the second trapezoid on top of the hexagon (refer to picture below). Make sure the seam lines are matching and stitch!
  • Repeat the process with the other four sides. Press the seams from the back like in the picture below. Did you notice the marking are all gone?!! That's the beauty of the frixion pens!
  • Now to assemble the coaster I followed this tutorial by Jessee Maloney, which I found to be very helpful. And this is what I ended up with!


This coaster is the perfect size for my IKEA mugs, however they are slightly small for a regular sized mug. The great thing about having a sewing pattern as a .studio file is that you can easily modify it and enlarge however much you'd like to. Just make sure sure all your shapes are selected as you do this. And if you do enlarge it, don't forget to review the amount of fabric you will need. It's really easy to figure that out, just check the "new" size of the squares and rectangles surrounding the hexagons and trapezoids.

Now it's your turn to tell me what if your favorite way to mark fabric! 


* This post may contain affiliate links. This means that if you make a purchase using the link I get a very small commission and the cost is the same to you. Thank you! 

Monday, February 29, 2016

Souflé Recipe


Souflé - the perfect item for a brunch with friends. I have great recipe for you and believe it or not, it’s much easier than you would think.

Ingredients (for 6 individual ramekins)

For crust

  • 1 cup cold milk
  • 2 tsp dry yeast
  • 2 Tbsp sugar
  • 3 cups flour
  • ½ cup melted butter
  • ½ tsp salt

For filling

  • 6 eggs
  • 6 Tbsp heavy cream
  • 1 1/2 cup shredded mozzarella cheese
  • Salt and pepper to taste

To make the dough:

  • Mix all ingredients and knead the dough just enough to make it smooth and uniform.

  • Grease 6 individual ramekins. 

  • Divide the dough into 6 equal parts. On a clean surface sprinkled with a little flour, roll the dough open into a circle. 

  • Carefully line the ramekin with the dough. Use a knife to cut out excess. 

  • Preheat the oven to 350F.
  • Now for the filling, mix all ingredients and distribute it amongst the 6 ramekins. Don't fill it up to the top, the filling will expand. 

  • Place the ramekins straight into the oven for about 30-35 mins, or until golden on top. 
  • Use hot pads to carefully remove them from the oven, they will be very hot!

And there you have it! As soon as you remove it from the oven it will be nicely puffed (like in the picture above), but as it cools down it flattens a little, that’s normal.

You could play around with the recipe and add sautéed spinach, artichokes or anything you like to your filling. Just be creative! My husband suggested feta cheese, so next time I make this I will be mixing in spinach and feta cheese.

If by any chance you have any leftover dough, you can use it to make dinner rolls, or use as pizza crust. In fact, this is the recipe I use for homemade pizzas and they turn out a-mazing.

On a different note, I am putting my hexie placemat to good use use and I just love how well it coordinates with my dishware. This was such a fun little project. I guess now I'll have to make more of these to match my other sets of dishes!

Hope you have fun trying out this little recipe and let me know how it goes.


Monday, February 22, 2016

Freebie


I have a freebie for you today! A while ago I was playing around with some hand-lettering and this is what I came up with.


I "traced" the above image in Silhouette Studio to turn it into a cuttable file and I am giving it away for free! You can download the .studio file here. I would love to see what you make out of this. If you happen to use it please tag me on Instagram and help me spread the word!

I used a Mark-B-Gone pen in my Silhouette to sketch the design to the fabric and stem stitched over it. I thought the inner part of the word was too empty so I added some french knots just for fun! 


Need more ideas on how to use this awesome freebie? Check out how it looks when cut out of flocked heat transfer.

Enjoy your day!

* This post may contain affiliate links. This means that if you make a purchase using the link I get a very small commission and the cost is the same to you. Thank you! 

Monday, February 15, 2016

How to Sew a Napkin Ring


Last time I wrote a tutorial on how to make an appliqué using Silhouette. Today I am going to show you how to sew the actual napkin ring. Let’s get down to it!

Materials:


  • Sewing machine
  • 8” x 4.5” piece of fabric
  • 8” of binding in coordinating fabric
  • 1.5” of hook and loop tape
  • Applique (optional)

How to assemble:


  • Hand-stitch the appliqué to the RIGHT side of the fabric. Sew the hook and loop to the fabric as pictured below.

  • Fold the fabric lengthwise (RIGHT sides together) and stitch the sides together. Do the same with the binding. Turn the fabric and binding inside out and press.


  • With raw edges together, pin the binding to the fabric. Sew a ¼’’ seam. 


  • Fold the binding over to the other side of the napkin holder. Press.

  • Blindstitch the binding to the opposite side of the napkin ring. And you are all done!


Related Posts Plugin for WordPress, Blogger...