
Hi everyone! I am back after a couple of super busy weeks trying to get the little man adjusted into a toddler bed after he learnt how to climb out of his crib. All I can say is "phew"...
You will need:
- Pattern (you can find it here)
-Pattern paper material (optional)
- 30'' cotton flannel (45'' wide)
- 1 spool matching thread
- 30'' elastic band (1/2'' wide)
- safety pin
- sewing machine
- iron
Note: Seam allowance is 1/2'' throughout.
Start by washing and drying the fabric as you would wash your child's clothes.
Print the pattern, making sure that in your "printer settings" the scale is at 100%. Cut the paper following the lines and tape the pieces together at the dots. You may trace this design to pattern paper material available at fabric stores. Using this kind of paper it is easier to pin the pattern to the fabric.
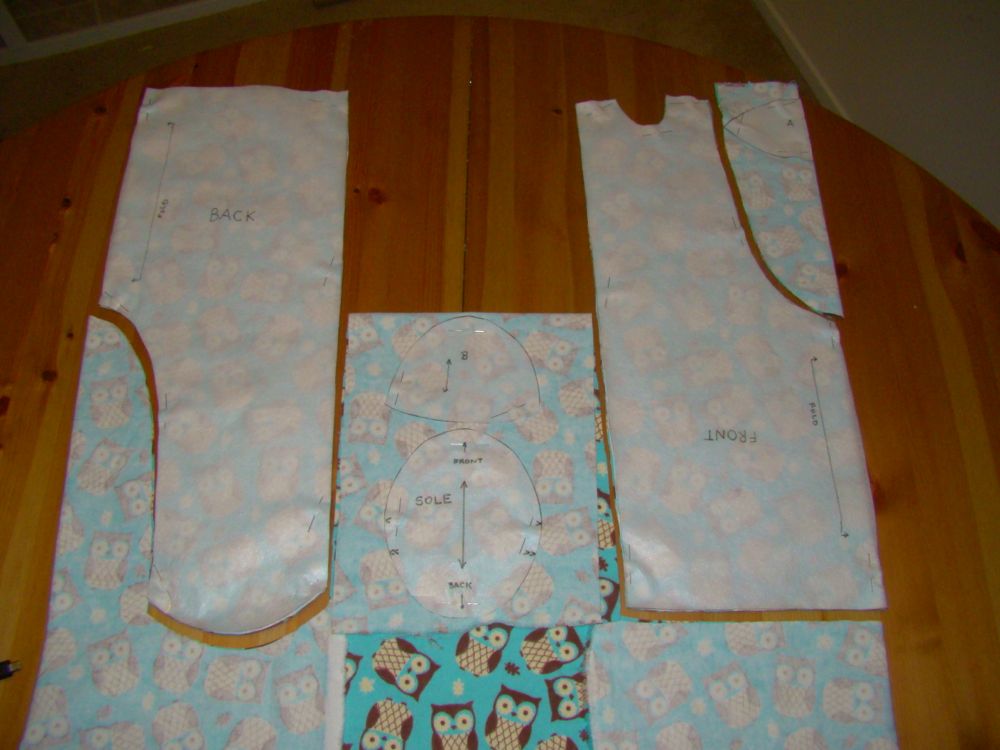
Next, fold the selvages towards the center and pin the pieces labeled BACK and FRONT to each folded edge and cut.

Now place the other pieces like I did in this picture, always making sure the arrows align with the grain of the fabric. Notice that I folded the piece A and pined it to the folded edge on the right. Transfer all the dot markings in the pattern to the WRONG side of the pieces. You can use a disappearing marker or a fabric pencil.

Now open up the FRONT and A pieces

With RIGHT sides together pin the piece A to the FRONT, matching the dots. Stitch. Press the seam open and zigzag the edges together.

With RIGHT sides together pin the pieces B to the FRONT at easch feet. Stitch. Press the seam open. Trim the seam to 1/4'' and zigzag the edges together.


With RIGHT sides together pin the BACK to the FRONT at the side seams and inner leg seam. Make sure you pin the piece A to the center of the BACK. Stitch the side seams and inner seam. Press the seams open, trim the seam allowance to 1/4'' and zigzag.


With RIGHT sides together pin the SOLE to the leg openings. Stitch, press open seam, trim to 1/4'' and zigzag.

Now you are almost done. With RIGHT side out fold the upper edge of the garment inwards 1/4'' and press it all around.

Fold again, this time 3/4'' and press all around.

Stitch close to the inner folded edge, but MAKE SURE YOU LEAVE A 1'' OPENING AT A SIDE SEAM (so you can thread the elastic!!)

Wrap the elastic around the waist of your child to see how much you will need. Remember, this is elastic, so make it a little smaller, to be sure the pants won't fall down... not uncomfortably tight either. Use a safety pin to thread the elastic inside the casing. When you are done stitch the elastic edges together and trim.


Keep the elastic completely inside the casing and stitch it closed, making sure not to stitch over the elastic. And there you go!!

Finished size:
18'' from waist to heel
4 1/2'' sole of foot
Happy Sewing!
Anyway, while I wasn't busy sleep training I was working on this "Toddler Footed Pyjama" project, which I'd been aching to do for months. One of my dear friends is from Russia and in one of her trips home she brought back these footed pants made of cotton flannel, which were sooooo cozy. I've never seen anything like this around here. They are really roomy in the diaper area (cloth diapering moms of the world, this is your dream come true!) But they are also snug at the legs so you can even put them under another pants and give that extra layer of warmth for them to play in the snow.
Since Toby was outgrowing the Russian PJs, I decided to make a few adjustments and came up with a pattern for these awesome pants. They turned out a little too roomy in the hips, something I'll have to revise in a future version of this pattern. But let's go with this one for now.
You will need:
- Pattern (you can find it here)
-Pattern paper material (optional)
- 30'' cotton flannel (45'' wide)
- 1 spool matching thread
- 30'' elastic band (1/2'' wide)
- safety pin
- sewing machine
- iron
Note: Seam allowance is 1/2'' throughout.
Start by washing and drying the fabric as you would wash your child's clothes.
Print the pattern, making sure that in your "printer settings" the scale is at 100%. Cut the paper following the lines and tape the pieces together at the dots. You may trace this design to pattern paper material available at fabric stores. Using this kind of paper it is easier to pin the pattern to the fabric.
Next, fold the selvages towards the center and pin the pieces labeled BACK and FRONT to each folded edge and cut.

Now place the other pieces like I did in this picture, always making sure the arrows align with the grain of the fabric. Notice that I folded the piece A and pined it to the folded edge on the right. Transfer all the dot markings in the pattern to the WRONG side of the pieces. You can use a disappearing marker or a fabric pencil.
Now open up the FRONT and A pieces

With RIGHT sides together pin the piece A to the FRONT, matching the dots. Stitch. Press the seam open and zigzag the edges together.

With RIGHT sides together pin the pieces B to the FRONT at easch feet. Stitch. Press the seam open. Trim the seam to 1/4'' and zigzag the edges together.


With RIGHT sides together pin the BACK to the FRONT at the side seams and inner leg seam. Make sure you pin the piece A to the center of the BACK. Stitch the side seams and inner seam. Press the seams open, trim the seam allowance to 1/4'' and zigzag.


 |
| Stitching the piece A to the BACK |

Now you are almost done. With RIGHT side out fold the upper edge of the garment inwards 1/4'' and press it all around.

Fold again, this time 3/4'' and press all around.

Stitch close to the inner folded edge, but MAKE SURE YOU LEAVE A 1'' OPENING AT A SIDE SEAM (so you can thread the elastic!!)

Wrap the elastic around the waist of your child to see how much you will need. Remember, this is elastic, so make it a little smaller, to be sure the pants won't fall down... not uncomfortably tight either. Use a safety pin to thread the elastic inside the casing. When you are done stitch the elastic edges together and trim.


Keep the elastic completely inside the casing and stitch it closed, making sure not to stitch over the elastic. And there you go!!

Finished size:
18'' from waist to heel
4 1/2'' sole of foot
Happy Sewing!
Hello!
ReplyDeleteI'd love the pattern for your footed pants. What's your email address?
Hi there! I just made a link to the pattern in the list of materials, hope you will find it useful :)
ReplyDeleteThank you!
ReplyDeleteOops, one more thing: just wondering, is the 1/2" seam allowance included in the pattern, or does it need to be added on?
ReplyDeleteThanks!
Yep, it's included, no need to add anything. Like I said, the pattern is a little bulky in the hips... if you would like to change anything I would suggest making the hips a little smaller. I will probably be doing that for the next one I make, once my little guy outgrows this one. Will post it here whenever that happens. But I love these, even if they are a little too roomy. Let me know how it goes and if you have any other questions.
ReplyDeleteadorei!! parabens pelo blog!!
ReplyDeletewhat age is the pattern made for??
ReplyDeleteMy son was wearing these when he was around 18 months and he is petite. If you have the child in front of you I would measure and compare with the finished size in the post. But I guess even a 1 year old may fit in these. It's definitely on the smaller side. Hope this helps...
DeleteI'm so excited to find this pattern made out of flannel. Thx for sharing.
ReplyDelete